
*This is a paid partnership with Rubbermaid;
all opinions remain 100% our own
When we co-founded The Home Edit, our motivation was to change the way people think about organization. (No, we don’t expect everyone to feel the same amount of joy as we do when we figure out a new way to store canned goods, but it’s worth a try.)
It also happens to be the only thing we’re good at. An organized space makes life run more smoothly, and who wouldn't want that?
We also know that not everyone is able or wants to commit to a full in-person organizing service. So in the spirit of “we know you (too) can do it”, we decided it was time to design another option: VIRTUAL DIY. It’s our way to walk you through the process step-by-step without physically being in your home. (Because let’s be honest…we’re a lot to deal with.)
To give you an example of how VIRTUAL DIY works, we partnered with Rubbermaid to help our virtual client, Courtney transform her pantry with their BRILLIANCE Pantry Food Storage Containers, along with our favorite bins. Read about her experience below!
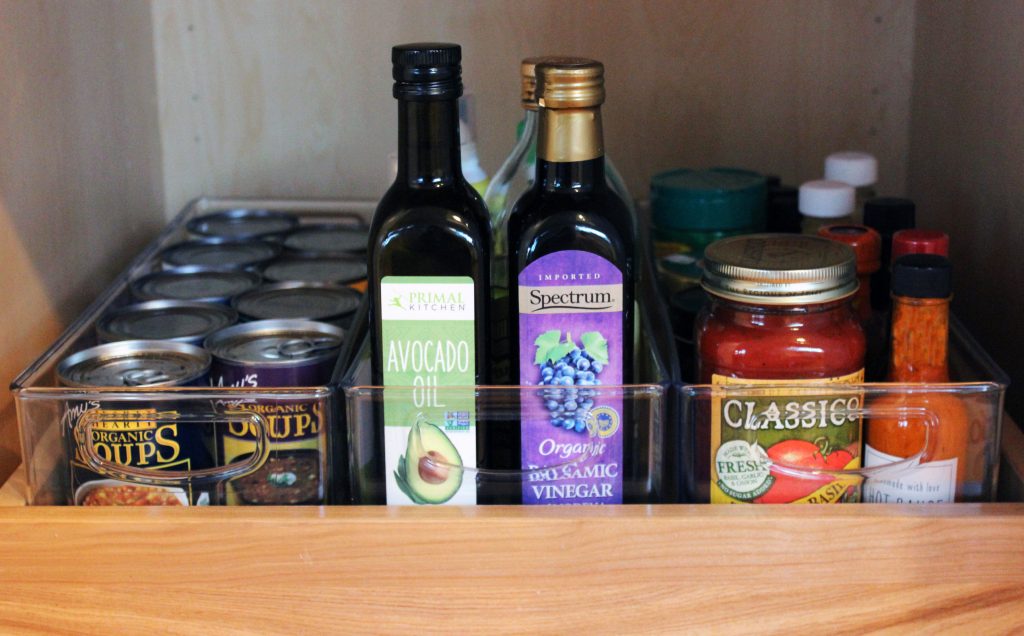
COURTNEY’S PANTRY
Hey, y’all! Welcome to my pantry. I live in a house that I share with two roommates and I don’t mean to gossip, but I’m pretty sure they unload the groceries in the dark. Which is how the cabinet turned into a graveyard of stale crackers and cheap beer next to champagne.


To be honest, I was sick of living like this. In order to find an item, it required a certain level of search-and-rescue effort that I’m not willing to exert. So instead, I end up ignoring the pantry altogether and wasting all my money ordering Postmates.
The good news is that with the accessibility of its pull-out drawers, the pantry definitely has #InstagramGoals potential. All we needed to do was create a system that works for our lifestyle and is easy to maintain.
Except I didn’t know where to start. In fact, I find myself overwhelmed just looking at the pantry! I knew bins and canisters were exactly the system we needed, but at the same time, I didn’t know much beyond that. Which is why THE experts at The Home Edit were there to offer some customized help. Due to budget, I wasn’t ready to commit to their full in-person organizing service which is ultimately why VIRTUAL DIY was the perfect option.
Step 1: The first thing I did was fill out a short Q & A. It addresses everything from how many people live in your home and who needs to access what item to what style of bin you prefer. These answers allow the team to get a better feel of why you need their help in the first place and how they can make the space as functional as possible.
It was important for me to let the team know about my roommate situation and what we like to keep in our pantry (big snack people over here!). I also mentioned my frustration about eating out more than I should because I can’t see what pantry items we have on hand. By doing this, I was able to set a budget for the selected products, which is another reason this service is so affordable. Along with the Q&A, I sent pictures of my pantry and exact measurements….and let The Home Edit team go to work!
Step 2: Next comes the shopping list and a detailed layout with a set of instructions for placement. The layout is a rough mock-up that shows where all the products should go and what goes in it. Shopping for these items was easy because the list came with clickable purchase links and quantities of each.
From my questionnaire, THE team kept my specific requests in mind and set up realistic and manageable systems. Since one of my biggest stressors was lack of visibility, the team recommended using Rubbermaid BRILLIANCE containers for dry goods and snacks. The leak-proof containers are crystal-clear, so I can easily glance in my pantry to see what I have or if it’s time to restock. They are also perfect for stacking, so I can save space and stay organized at the same time!

For the other items (bulk snacks, produce, bread), THE team recommended clear bins to hold clearly defined categories, creating a system that all of my roommates can (most likely) stick to.


Step 3: Because the project was designed with my specific space and needs in mind, implementing the systems was incredibly easy. Along with the project came some helpful tips about unboxing the items and color coding - THE staples! The Home Edit team was also SUPER helpful in clarifying any items that were confusing to this novice organizer.
The Result: After going through VIRTUAL DIY process and completing my pantry, I would say it’s the perfect service for anyone who likes organizing (or at least the idea of organizing - ha!) but is in need of resources and the expertise of serious professional organizers like THE team at The Home Edit.

I’m sooooo excited about my pantry because It’s no longer a place that fills me with existential dread. Instead, it’s become a soothing place of organization and ease. Totally worth the investment, both time and money. No more unnecessary trips to the grocery store or roommate bickering! Next step? Order some custom labels for the finishing touch.


Thoughts welcome!